The Ratings, Reviews, and Feedback Add-on gives you full control over the display of ratings and reviews, set custom templates, and make your courses better with student feedback.
This article will give you an overview of how to leverage this powerful add-on for your course website.
Installation, Activation, and Prerequisites #
Before getting started with Ratings, Reviews, and Feedback , please ensure you have the LearnDash LMS plugin installed and activated, that your site meets or exceeds our prerequisites, and you have the add-on properly installed and activated.
Features: Ratings & Reviews #
Here the user can check the most popular reviews, average ratings and post a review by clicking on a Write a review button.
Once reviews have been enabled for a course a review section is shown below the course content replacing the comments area.

When ratings are enabled, your course visitors will also see a ratings popup.

Administrators of your website can review and moderate the reviews in the admin by going to Course Reviews > All Course Reviews . There they can Edit, Trash, View, or Reject each review individually.

Features: Review Shortcode #
With the Review Shortcode you can show reviews anywhere on the website using this simple shortcode.
This shortcode has only one attribute i.e., course_id. So, you can use it like [rrf_course_review course_id="x"] anywhere inside your page content.
Features: All Reviews Shortcode #
Create any page and add the above shortcode and it will show a reviews section just like the one shown below.
You can show reviews for all the courses on a single page now with [rrf_all_reviews] shortcode.

As you can see, this shortcode allows you to filter reviews by Courses and/or star ratings. You can also sort the reviews by Most Recent or Top reviews.
Features: Show Ratings Shortcode #
This shortcode is useful when you create a custom course grid using a page builder or when you want to show the stars in a specific location of a custom designed page.
You can show only the star ratings of a particular course by using [rrf_show_ratings] shortcode. This shortcode has one required attribute i.e., course_id.
Features: Feedback #
After a user completes the course a button to post feedback is available near the print certificate button on the course page. Clicking this will open a dialog where the user will be able to submit personal feedback as shown below.

Settings: Feedback #
To configure Feedback go to Dashboard > Course Feedback > Settings > General tab.
- There is a setting to enable feedback by default for all courses.
- There is also a setting to enable emails to the author when feedback is submitted for a course.
- Also, you can change the text of the feedback button.

NOTE: This is a global setting that can be overridden for each individual course.
Feedback Email Template #
To customize this, go to Dashboard > Course Feedback > Settings > Email Template tab.
You can design the feedback submission email to be sent to each instructor with the student details using the wp editor and user info shortcodes.
The list of available shortcodes is mentioned below:
User shortcodes #
User first name: [user_first_name]
User last name: [user_last_name]
User display name: [user_display_name]
User email ID: [user_email_id]
User ID: [user_id]
Author shortcodes #
Author first name: [author_first_name]
Author last name: [author_last_name]
Author display name: [author_display_name]
Author email ID: [author_email_id]
Author ID: [author_id]
Course shortcodes #
Course title: [course_title]
Course link: [course_link]
Course ID: [course_id]
Feedback shortcodes #
Feedback of the user: [feedback_content]
Feedback link: [feedback_link]
Feedback ID: [feedback_id]
Course Specific Feedback Settings #
He can opt to enable/disable or use the global setting set by the website administrator. Other than this, there is also a link to see all of the feedback submitted by users for that particular course.
The feedback is basically a personal message to the instructor regarding his/her course. As such it is only available in the WordPress backend and isnt shown on the frontend of the website. So there is no need for approval/rejection system for feedback messages.
When the admin/instructor creates a course, she gets the option to select whether she wants to enable feedback for that particular course.

Settings: Ratings & Reviews #
You can access Ratings & Reviews by navigating to Dashboard > Course Reviews > Settings > General tab.
There are 3 settings available in General Settings
- Allow comment on reviews: This setting allows people to comment on the reviews published on a course.
- Global Course Review Switch: This is a dual-list toggle selector which helps admin directly enable/disable reviews for all the courses.
- Admin approval required on reviews: Disabling this will allow users reviews to directly be published on the website without admin approval.
- Allow media upload on reviews: Enabling this will allow the students to upload images & videos along with their reviews.
- Color for filled stars:This color picker is used to set theme color for your stars and bar ratings.
- Minimum number of reviews: This setting is used to set the minimum number of reviews that should be collected before showing stars against a courses name.
- Review notification: This setting is used to enable email notification to the course author whenever a review is posted for a course.
- Review default rejection email settings:
- Rejection Subject: This allows you to set a subject for the rejection emails sent to the reviewers.
- Rejection Message: This allows you to set a message for the rejection emails sent to the reviewers.
Email Template #
To customize this, go to Dashboard > Course Reviews > Settings > Email Template tab.
The list of all the available shortcode for the email is given below:
User shortcodes #
[user_first_name] : User first name
[user_last_name] : User last name
[user_display_name] : User display name
[user_email_id] : User email ID
[user_id] : User ID
Author shortcodes #
[author_first_name] : Author first name
[author_last_name] : Author last name
[author_display_name] : Author display name
[author_email_id] : Author email ID
[author_id] : Author ID
Course shortcodes #
[course_title] : Course title
[course_link] : Course link
[course_id] : Course ID
Review shortcodes #
[review_headline] : Headline of the Review
Course Specific Settings #
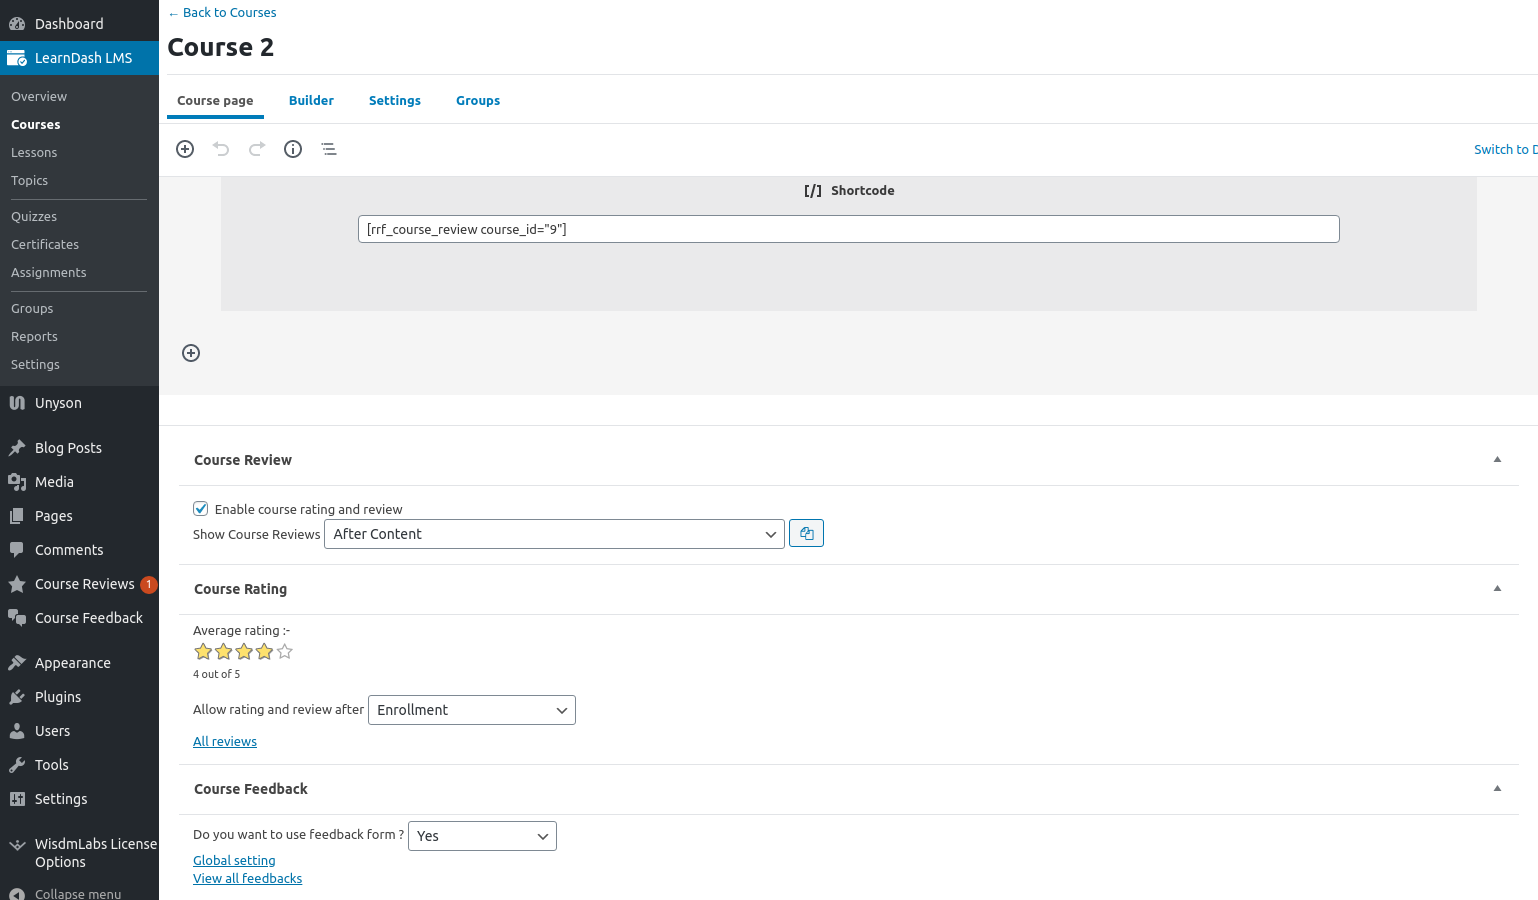
There is also a setting to configure the location of the reviews section i.e., After Content, Before Content or Custom Location(using [rrf_course_review] shortcode).
Other than these the instructor will be able to see the average reviews obtained in the course edit page.
Also, the admin will be able to configure when to enable the reviews for a particular course i.e, when the admin/instructor creates a course, he/she gets the option to select whether he/she wants to enable ratings & reviews for that particular course.
- On Course Enrollment
- On Course Completion
- On any of the Lessons completion
- On any of the Topics completion.
All of the reviews posted on the website are in pending approval mode by default and will need to be manually approved or rejected by the website administrator.
This is done to avoid spamming and stop inappropriate reviews from being added by the users.
Other than these, there is a link to see All Reviews submitted for that course.
Review Prompt and Reminder Settings #
These settings impact how your review emails and review reminders are presented.
Review Prompt Emails #
You can access Review Prompt Email Settings by going to Dashboard > Course Reviews > Settings > Review Prompt Email Settings tab.
Clicking on Enable checkbox enables this feature where an email is sent to each student as soon as he/she becomes eligible for posting a review.
As the name suggests this feature prompts the user to post a review as soon as they become eligible for the same.

You can even customize and design the email being sent using the email template designer provided as shown above. This comes together with a list of shortcodes that can be used as per your requirements.
Review Reminder Settings #
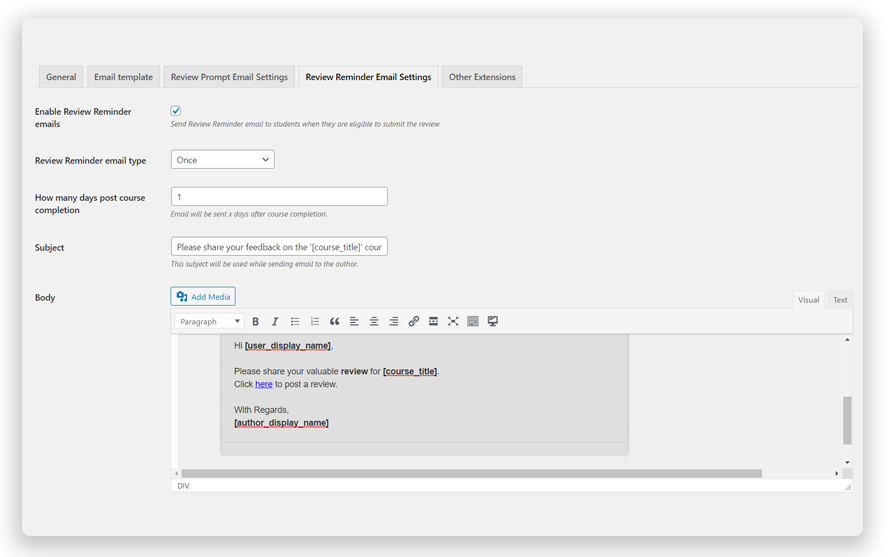
You can access Review Reminder Email Settings by going to DASHBOARD > COURSE REVIEWS > SETTINGS > REVIEW REMINDER EMAIL Settings tab.
Clicking on Enable checkbox enables this feature. After this, you need to set the frequency of the emails to either once or periodic ( daily or weekly, or monthly ).
If you want to send reminders just once then you need to select how many days post-course completion should this reminder be sent.
For periodic reminders, you need to set the day or date depending on whether its weekly or monthly.
You want to make sure you are not spamming your students and filling up their inboxes. To ensure that, theres a stoppage setting available. This setting is labeled Number of reminder emails to be sent.
You can even customize and design the email being sent using the email template designer provided as shown above. This comes together with a list of shortcodes that can be used as per your requirements.
As the name suggests this setting is used to send follow-up emails to students who havent posted reviews asking them to do the same.
The following video demonstrates both of these features:
Export Reviews #
Export your reviews to CSV for deeper analysis or to showcase your best reviews elsewhere on your site. You can access this menu by going to Review Settings > Export Reviews tab. This feature allows you to export all of the reviews for a particular course in a CSV file format.

How-To Videos for the Ratings, Reviews, and Feedback Add-on #
These videos will walk you through several of our most popular features and how to implement them on your website.