The Frontend Dashboard for Instructors (and Admins) allows access to core LearnDash and other related add-on functions from the frontend of your website without the need to provide instructors with backend access. This dashboard serves as an alternative to the previous Instructor dashboard, which was a simplified and access-restricted version of the WordPress dashboard in the backend
The Frontend Dashboard is a Gutenberg block-based dashboard that comes with a powerful dashboard builder block making it fully customizable and extendable. Don’t worry even if you have disabled the Gutenberg Editor, you can still use our global settings to customize the frontend dashboard. The default Frontend Dashboard comes with multiple options:
- Overview: A quick snapshot of your Course List, Students, Submissions and their Quiz attempts. There are also four defined sections: Earnings, Top Courses, Course Report, and Latest Submissions.
- Course List: A course list that allows you to create a new course or edit a course using our Frontend Course Creator. You can also view your existing Course List and use the filter options to find specific course List by Date, Price, Categories or tags.
- Quiz List: A Quiz List that allows you to create new Quiz List or edit new quiz List using our Frontend Course Creator. You can also view your existing quize List and use the filter options to find specific ones by date, course, lesson, topic, category, or tags.
- Products: A products tab for instructors and administrators gives a fresh tab view for their WooCommerce products. Note: If the LearnDash WooCommerce add-on is disabled or inactive, the Product tab will be hidden. To enable it, simply activate the WooCommerce for LearnDash add-on. You can also filter your products by category to quickly find the ones you’re looking for.
- Commissions: A Commission tab for instructors that provides a detailed view of the instructor commissions and payout logs.You can view your earnings, commission summary, orders, and payout transaction history. Additionally, you can download a CSV report for both orders and payout transaction history.
- Assignments: The Assignments block provides a unique and streamlined view of assignment submissions to help you manage them with ease. You can easily search for assignments by lesson or topic. Additionally, you can filter them by course to quickly find the specific assignments you’re looking for.
- Essays: The Essays block provides a unique and streamlined view of student essay submissions to help the admin and instructor manage essay submissions more efficiently. You can easily search for essays and filter them by course or quiz to quickly find the specific ones you’re looking for.
- Quiz Attempts: The Quiz Attempts block allows instructors and administrators to easily access and review all student quiz attempts directly. You can also filter quizzes by group, course, quiz name, learner, or date of attempt.
- Comments: The Comments block allows users to efficiently manage and navigate comments across courses, lessons, topics, quizzes, essays, and assignments. You can also bulk approve or delete multiple comments at once.
- Course reports: The course report block allows you to track learner activity, view progress, and analyze the overall effectiveness of your courses. The Course Reports section in the Frontend Dashboard makes it easy to monitor and manage your courses with clear, detailed insights.
- Groups: The Group block allows you to easily manage and keep track of groups of learners. This is especially helpful for schools, organizations, or training programs where students are divided into groups. It lets you see how well each group is doing, track their progress, and review their overall performance.
- Certificates: The Certificates block in the Frontend Dashboard is where you can manage and view certificates earned by students. This is particularly useful for tracking which learners have completed their courses or quizzes and earned the certificates. You can also filter the certificate by date and includes the option to bulk delete certificates.
- Settings: A settings tab for instructors to configure their profile info, email notification, and Paypal info for payouts.
Configuring the Frontend Dashboard using the Onboarding Wizard #
Welcome Screen #
Upon installation or updating the plugin, you will be greeted with a dashboard onboarding pop-up to set up your frontend dashboard. Click on the Configure button to proceed.
Even if you close the welcome pop-up, you can still configure Frontend Dashboard by going to LearnDash LMS > Instructor > Dashboard Settings
Frontend Dashboard Configuration #
You will be directed to the Frontend Dashboard Configuration page.
Here, you can configure various settings related to the Frontend Dashboard, including:
- Adding a link to the frontend dashboard in the primary menu for instructors: A link titled Instructor Dashboard will be added to the header of your site. It will redirect users to the frontend dashboard if the Backend (WordPress) Instructor Dashboard (refer below) is disabled, or else it will redirect the users to the Backend (WP) Instructor Dashboard
- Redirect Instructor to frontend dashboard upon login: Seamlessly guide instructors to their frontend dashboard upon login, eliminating the need for backend access and ensuring a focused and user-friendly experience
- Select Dashboard Option: You can select any page or choose the default Frontend Dashboard page in this setting.
- Disabling the Backend (WP) Instructor Dashboard: This will completely restrict instructors’ access to the backend of your site. The Instructor will not be able to access their Backend (WordPress) Instructor dashboard and will be redirected to the site’s homepage if they try to access their backend dashboard at: www.your-site-name.com/wp-admin.
Note: If you want to change any of these settings later, you can do so by going to the Dashboard Settings page.
Take your time configuring these settings according to your preferences. Once you’re done, click on the Create Dashboard button to create a new page for the frontend dashboard. A new page will be created automatically and saved in your draft.
Customize Frontend Dashboard and publish the page #
You will be taken to the next step depending on whether the Gutenberg editor is disabled on your site.
If you have not disabled Gutenberg editor on your site, you can take advantage of the powerful page builder to edit the dashboard page along with accessing all the customization settings provided with our frontend dashboard
Once you click on Create Dashboard, you will be directed to the new dashboard edit page. Here, you will find a default preset Frontend Dashboard Gutenberg Blocks pattern already added to the page
Before Launching Frontend Dashboard Page
Feel free to customize the frontend dashboard Gutenberg blocks (Refer here to learn about how to Customize the dashboard in detail) as per your requirements. Below is a quick overview of different customization settings:
- The Frontend Dashboard is made of Gutenberg blocks. It consists of a dashboard builder block called Dashboard Tabs which creates the dashboard layout, and all other instructor dashboard tabs in it are made of a Gutenberg block each
- Rearrange the tabs as required. Create as many custom tabs as needed to share relevant content or provide access to any functionalities to the instructors
- To change the appearance, explore the typography and color settings under the Dashboard Tabs block settings. Choose from a selection of fonts, color preset, or create a custom color pattern to achieve your desired look.
- Go to the Instructors overview tab block and hide any of the sections not relevant to your needs
- Set the page template. By default, a Dashboard template is selected, which is specially designed for a dashboard page. But you can choose any other page template provided in your theme
Once you’re satisfied with the changes, click the Publish button to make the frontend dashboard live.
Thats it! After publishing, you will be automatically redirected to your newly created frontend dashboard page. From here, instructors can easily manage their courses and quizzes, providing a seamless and user-friendly experience.
Note: If, for some reason you have disabled the Gutenberg Editor, you can still customize the dashboard using the Global settings provided here LearnDash LMS > Instructors > Dashboard Settings.
Global Settings #
The global settings are designed for sites that do not utilize the Gutenberg block editor, such as those still using the Classic Editor or add-ons to disable the block editor. By default, the global settings are disabled if your site has Gutenberg Editor enabled.
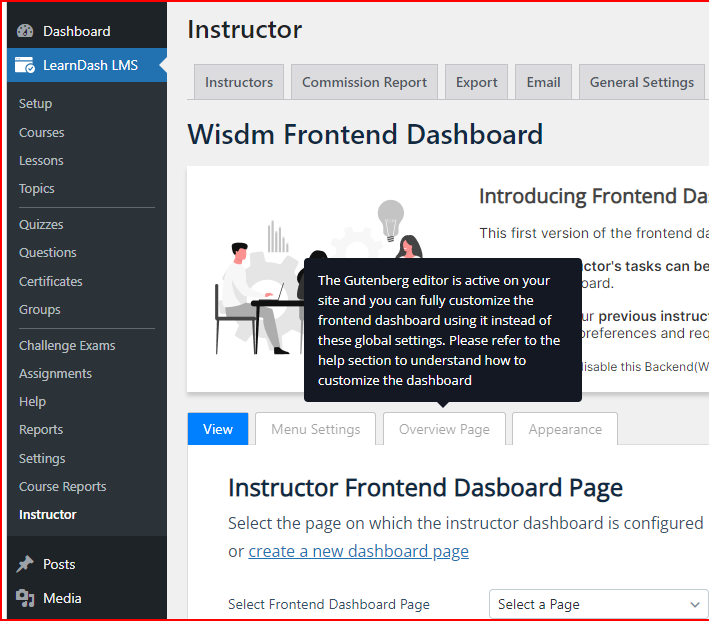
If you have Gutenberg editor disabled on your site, you can access the Global settings to customize the Dashboard.
- The Menu Settings tab provides a setting that allows you to hide any tab on the dashboard, thereby restrictingthe instructor’s access.

- The Overview page settings allow you to hide any of the options on the Overview page of the dashboard
- The Appearance settings allow you to style the dashboard by either selecting provided color presets or creating your own custom color palette. Additionally, you can set the type font and font size styles for the dashboard. You can also upload and adjust all the settings for the logo, like image upload, alignment, and Background Color.
Note: When using global settings, these settings are only applied to the page set as the frontend dashboard page in the Frontend Dashboard Page setting.
Deleting the Frontend Dashboard Page #
You can find the frontend dashboard page created via the above onboarding wizard by going to the WordPress Dashboard > Pages > Instructor Dashboard. You can delete/edit the page from here.
Creating a new Frontend Dashboard page #
If, by chance, you have deleted the Frontend dashboard page initially created with the onboarding wizard when you first activated the plugin and want to create a new dashboard page, follow the steps below:
Quick Link: Create a new dashboard page #
You can find the quick setup wizard to create a new dashboard page on the WordPress Admin dashboard > LearnDash LMS > Instructor > Dashboard Settings. Click on the + New Dashboard. It will automatically create a new page with the frontend dashboard configured in it, and you will be redirected to the page in the edit mode
Along with creating this new page, it will automatically be set as the default Frontend Dashboard page for Instructors and Admin.This page is where all the redirection and global customization settings (if Gutenberg editor is disabled) are available in the plugin when applied to.
If you have created multiple dashboard pages and wish to keep other dashboard pages as default, then select the preferred page in the Select Dashboard dropdown. Don’t forget to click on Save Settings button after all changes are done
Create the Frontend Dashboard page from scratch using Gutenberg Editor #
Let’s see how you can create a new dashboard page without using the quick setup wizard discussed above.
Create a new page #
- Go to the WordPress Dashboard > Pages
- Click on Add New to create a new page
Add Frontend Dashboard pattern #
Once you are on the page editing area, click on the + in the top right and go to patterns. You will find the Frontend Dashboard pattern under the Instructor Role category. Click on the pattern, and it will get added to the page.
Add Instructor Dashboard Blocks Individually #
If you prefer to add the Instructor Dashboard Blocks individually instead of using the dashboard pattern mentioned above, follow these steps:
- Dashboard Builder block: Click on the + icon on the top right corner, search for Dashboard Tabs block and add it to the page. This block helps you build any kind of dashboard.
- Create Dashboard Tab: Once you have added the Dashboard tabs block, click on the + icon in the block to create dashboard tabs. Give a name to the tab and select an icon for it.
- Add Instructor Blocks: Once you have created a dashboard tab, you can add any kind of content/Gutenberg blocks to it. To create our Instructor dashboard, add the Instructor Overview block to the overview tab we created earlier. Similarly, you can add all other tabs and add the relevant instructor dashboard blocks
Set as default Instructor Frontend Dashboard #
Once you have configured the dashboard, click on Publish to make the page live. Now you need to set this page as your default frontend dashboard for instructors and admin if you want all the redirection settings available in the plugin applied to it. Go to LearnDash LMS > Instructors > Dashboard settings.
In the select frontend dashboard page, choose the page you have created the dashboard on and click on save settings below
Congratulations! You have successfully installed and set up the Frontend Dashboard plugin. Enjoy the convenience and efficiency of managing your courses and learners directly from the frontend of your website. If you have any further questions or need assistance, please refer to our other documentation or reach out to our support team for help. Happy teaching!