The Stripe Connect integration is one of the quickest ways to start selling your LearnDash courses. Stripe is also one of the most popular payment gateways to set up, and their processing fees are similar to other gateways.
NOTE If you don’t already have a Stripe account, you can create one during the setup process. Stripe is not available in all countries. View available countries
Who Should Use Stripe Connect? #
You should consider using the Stripe Connect integration if:
- You want to easily start accepting secure credit card payments on your site for LearnDash content
- You don’t want to spend time creating an entire checkout experience for your users
Connect Your Stripe Account #
- Navigate to LearnDash LMS > Settings
- Click on the Payments Tab
- Click the Stripe Connect link
- Click on Connect Stripe
- You will be redirected to Stripe to sign in to your account or to create a new account.
- After you are redirected back to your WP admin dashboard, LearnDash will attempt to automatically configure your Stripe Webhook for both Live and Test Mode. If automatic configuration fails, you can configure your webhooks manually. To do so, please refer to the instructions here.
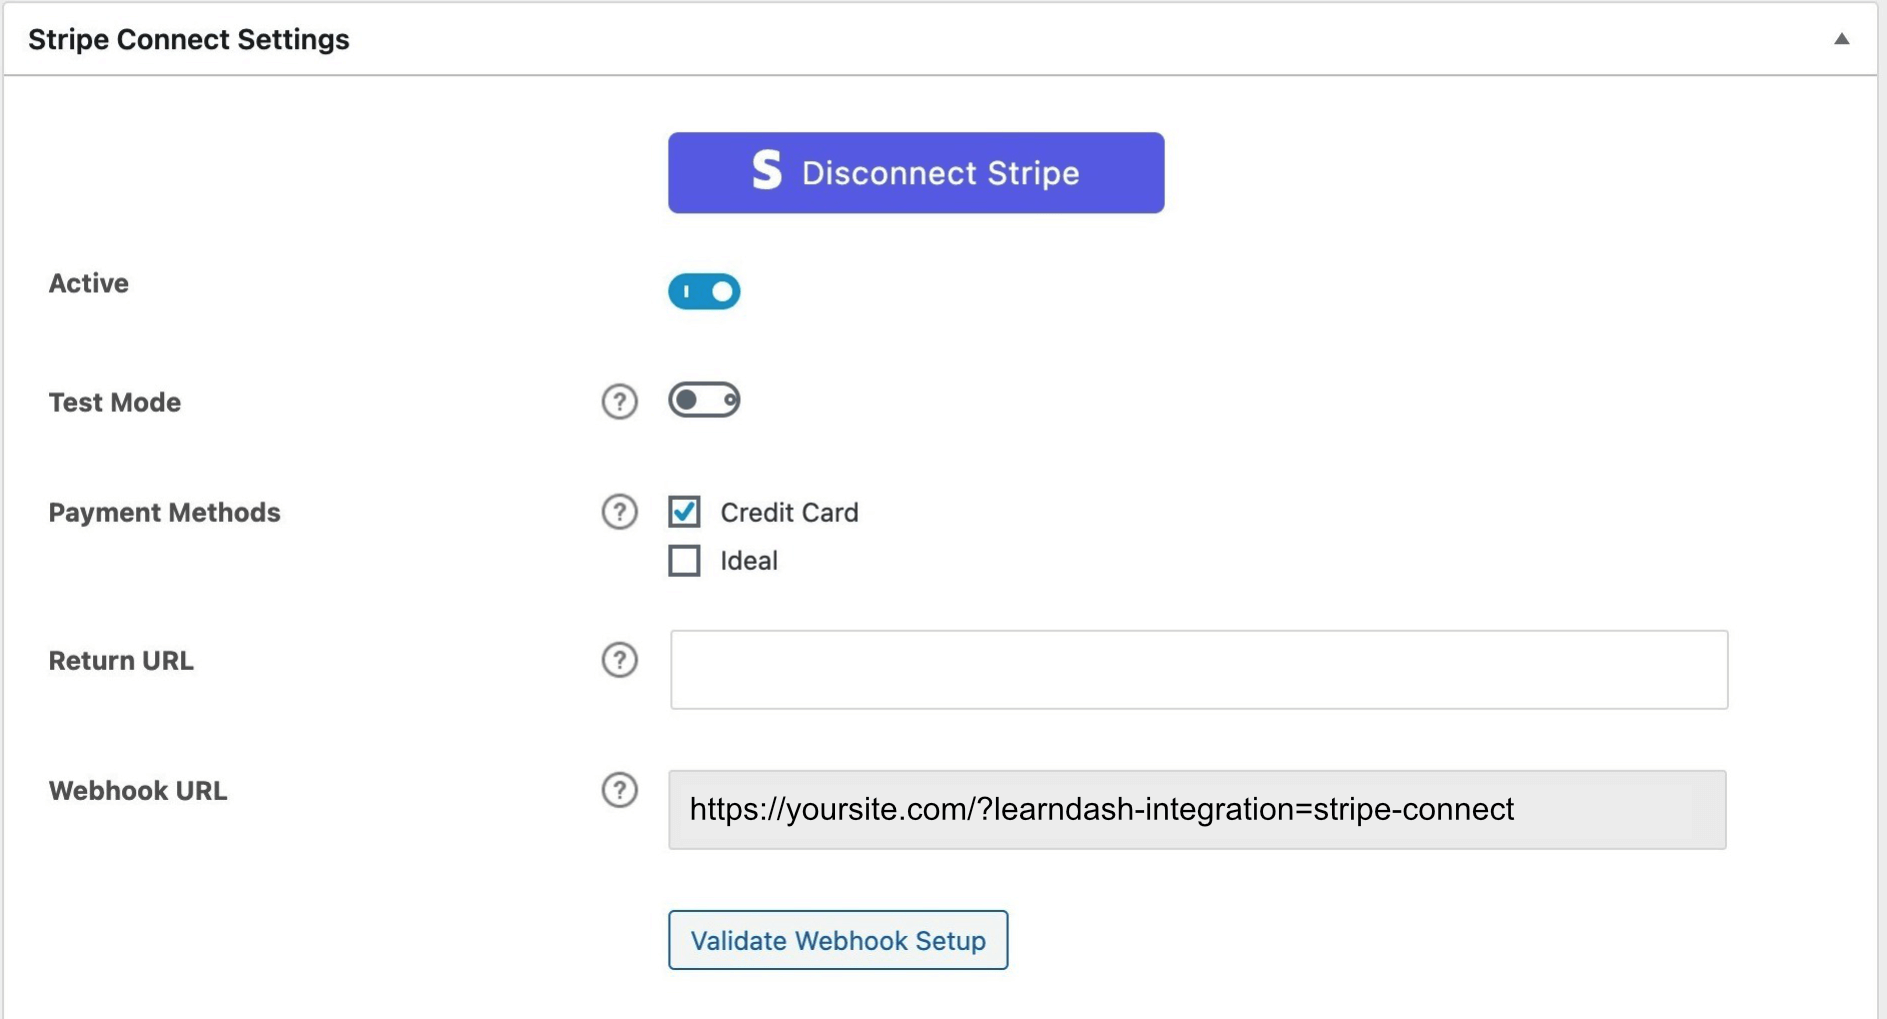
Stripe Settings #
Even with Stripe Connect, there are still a few settings that you need to fill out in order for this integration to work correctly.
Test Mode / Live Mode #
There are two ways you can set up the LearnDash Stripe integration: Test mode or Live mode.
- Test mode should be used when you’re still testing your site internally. No real money will actually change hands, but Stripe will record if the transaction succeeded or failed. You know you are in Test Mode when the Stripe dashboard is highlighted in orange.
- Live mode should be used when you’re ready to launch your course. All transactions in this mode are real transactions, and money will exchange hands. Once you’ve launched your site, you should stay in Live Mode indefinitely.

IMPORTANT: Stripe updated the Test Mode Subscription Data Retention policies and introduced their test clocks feature. Find out more about it below.
Stripe introduced the test clocks feature for Stripe Billing, which offers powerful testing capabilities and dramatically reduces the need to keep test mode subscriptions indefinitely. Test clocks simulate what your subscriptions and billing integrations would look like as if time has advanced to a future date. This will cause Billing resources, such as Subscriptions, to change state and trigger webhook events for testing purposes. You can learn more about them here.
Stripe has also updated their Data Retention policies for test mode data. Starting February 1, 2023, Stripe will:
- Automatically cancel test mode subscriptions 90 days after creation
- Automatically delete test mode subscriptions 30 days after cancellation
- You can mark up to 50 test mode subscriptions as exempt in the Dashboard
Take note that this updated data retention policy only impacts test mode subscriptions. They have also updated their subscription testing guide to show you how you can continue to test throughout the entire subscription life cycle. You can check out their additional FAQs on the matter from their support site. If you have any concerns or issues pertaining to this or other Stripe-related concerns, feel free to reach out to them at: https://support.stripe.com.
Payment Methods – Credit Card and Ideal #
If you’re running a course that targets both an international and European audience, you can offer Credit Card payments for most users, but you can also enable iDEAL as a payment method for students in the Netherlands. This way, users have the flexibility to choose the payment method that works best for them.
Make sure to enable Credit Card and save your changes if it’s not already selected.
Webhook URL #
Stripe requires a Webhook URL to communicate with your site. This URL is automatically generated in LearnDash and must be pasted into your Stripe account’s webhook settings.
LearnDash will attempt to automatically configure your Stripe Webhook for both Live and Test Mode. If automatic configuration fails, you can configure your webhooks manually. To do so, please refer to the instructions here.
Add a Stripe Webhook #
- Log in to your Stripe account and navigate to https://dashboard.stripe.com/webhooks
- Click the Add endpoint button
- From your WordPress dashboard, go to LearnDash LMS > Settings > Payments > Stripe Connect and copy the auto-generated Webhook URL
- Back in Stripe, paste the Webhook URL you copied into the Endpoint URL field
- For Version, select the latest API version
- Under Events to send, enable ONLY the following events:
customer.subscription.deletedinvoice.payment_failedinvoice.paidcheckout.session.completedcoupon.deleted
NOTE: If you’re having problems with duplicated users after a failed payment or canceled transaction, you can also include the following events: charge.failed, payment_intent.payment_failed, payment_intent.canceled
- Click Add endpoint to save

Validate Webhook Setup #
After connecting your Stripe Account, the Live and Test Mode webhooks will be validated automatically. If you need to manually configure your webhook, you can validate the configuration by clicking the Validate Webhook Setup button.

Return URL (optional) #
You can choose to send users to a confirmation page after their purchase. If no return URL is provided, they will stay on the course page.
You can create this confirmation page using WordPress or a page builder, or use a page on another site. It’s entirely up to you.
Enter the full URL, beginning with https://.
Course Configuration #
After you’ve configured your Stripe for LearnDash settings, the final thing you need to do is set up your course to accept payments.
- In the WordPress admin area, navigate to LearnDash LMS > Courses
- Click on the course you’d like to sell with Stripe
- Click on Settings at the top
- Scroll down to Course Access Settings
- Set the Access Mode to one of two values:
- Buy Now: Use Buy Now for one-time payments
- Recurring: Use Recurring if you’d like to set up a recurring payment (aka: subscription)
And finally, enter your price in the Course Price field. Ex: 29.99
- The currency symbol will be added automatically for you
- If your price is an even dollar amount, you may omit the decimal point and cents (ex: 29)
For recurring payments, you need to include the Billing Cycle in days, weeks, months, or years.

The User Experience #
When users visit your course page, they will see a Take This Course button (this language can be customized using custom labels).
When a user clicks the purchase button, they will be taken to a secure checkout page (that is hosted on Stripe’s secure servers), where they can enter payment details and complete their purchase.
After payment is complete, a new user account is automatically created, and that user is enrolled in the course they just purchased.

NOTE: Existing website users must first be logged in before purchasing another course via Stripe to prevent duplicate customer account creation in Stripe or failed transactions on the customer’s end.
FAQ #
Yes. You will need to configure the PayPal settings within LearnDash, but once you’ve added that information, along with all the Stripe information, users will be presented with two options when they click the Take This Course button. It will look like this:
(design may vary based on your theme)
This is determined by your settings in Stripe. Please reference Stripe’s documentation on payouts.
Yes. In the course settings, just set your Access Mode to Recurring and choose a billing cycle.
Yes, you can use coupons with Stripe Connect. Check out Stripe’s documentation on using coupons to learn more. Also, consider using one of our other e-commerce or membership add-ons for more flexibility on payments.
Issuing refunds and canceling subscriptions is done from your Stripe account.
No. You can remove the course access from their profile.
Yes, as long as either invoice.payment_failed or customer.subscription.deleted events happen in Stripe, the user’s access will be removed. Both of these events happen in Stripe, which they then send back to your website.
From the Stripe events documentation page: https://stripe.com/docs/api/events/types
invoice.payment_failed – Occurs whenever an invoice payment attempt fails, either due to a declined payment or the lack of a stored payment method.
customer.subscription.deleted – Occurs whenever a user’s subscription ends.
Consider using a robust checkout plugin such as WooCommerce and pair it with our LearnDash WooCommerce addon (LearnDash LMS > Addons).
- First, deactivate the Stripe Add-on from your Plugins page or go to LearnDash LMS > Add-ons, and deactivate the Stripe Add-on
- Next, navigate to LearnDash LMS > Settings > Payments in your WordPress Admin Dashboard
- Click on Manage for the Stripe Connect payment method.
- Click on the Connect Stripe button and follow the provided prompts to set up Stripe Connect.
You can find more information on the entire process in our support documentation at: https://learndash.com/support/docs/core/settings/stripe-connect/
For LearnDash 4.5.0 or newer, there will be 2 transaction records per single transaction. This is normal, and your user will not be charged twice for each transaction. See our explanation on this in our Payment Transaction Records documentation.
Troubleshooting #
My Take this Course button is missing. #
The most likely cause for this is that you don’t have any active payment methods configured in LearnDash LMS > Settings > Payments

If you have one of the payment methods active, configured properly, and you are still not seeing the Take this Course button, please submit a support ticket with us and our team will be happy to investigate further.
My transactions are not going through. #
Please make sure your webhook settings are configured correctly. In order for the webhook to work, it needs to have at least these events active in your Stripe account:
checkout.session.completedinvoice.paidinvoice.payment_failedcustomer.subscription.deletedcoupon.deleted
I’m seeing a 500 HTTP and timeout error. #
If you are seeing the above error when checking out, make sure that the webhook settings are configured to ONLY the following events (enabling all events will likely cause a timeout error).
checkout.session.completedinvoice.paidinvoice.payment_failedcustomer.subscription.deletedcoupon.deleted
I’m getting duplicate customer accounts created after an initial failed or canceled transaction. #
If you see duplicate customer accounts being created after an initial failed or canceled transaction, and a subsequent successful purchase, you must have the following events enabled on your webhook settings in addition to the events above:
charge.failedpayment_intent.payment_failedpayment_intent.canceled
In case your user is an existing user or customer, ask them to first log in to their account prior to purchasing another course via Stripe to avoid account duplication.
The temporary development URL remains in your Live website, and you can’t edit it. #
When testing your Stripe configuration on a development site, you might find that once you point the production domain to make the site live, your Stripe webhook URL retains the old, temporary development URL. This will keep the endpoint from validating – it just gets stuck.
The solution: You can edit this webhook URL with the following line of code.
Add the following to your website’s wp-config.php file above the line that says – /* That’s all stop editing.
define('LEARNDASH_DEBUG', true);
You should then be able to edit the URL on the Stripe payments page to reflect the updated website address.
Finally, make sure to remove the LEARNDASH_DEBUG code from wp-config.php once you have edited the URL.