The LearnDash course settings screen allows you to set some global options that will apply to all courses on your site. Course settings are organized into a few sections, outlined below.
To access your global course settings:
- In the WordPress admin area, navigate to LEARNDASH LMS > COURSES
- Click the Settings tab

Course Taxonomies (Categories & Tags) #


Using course taxonomies is completely optional, but they provide an additional way to organize your courses, especially if you have many offerings.
- LearnDash Course Categories: This enables you to organize your courses into custom categories that are only available for LearnDash courses.
- LearnDash Course Tags: This enables you to organize your courses using custom tags that are only available for LearnDash courses.
- WordPress Post Categories: This enables you to organize your courses using WordPress’ default category management system. These categories can be viewed & managed in the WordPress admin under POSTS > CATEGORIES. You can share them amongst both the Posts & Courses post types.
- WordPress Post Tags: This enables you to organize your courses using WordPress’ default tag management system. These tags can be viewed & managed in the WordPress admin under POSTS > TAGS. You can share them amongst both the Posts & Courses post types.
If you’ve enabled these options, when you go to edit a course, you’ll see each of them in the sidebar of the editing screen. In the above screenshot, WordPress categories & tags are shown in pink, while LearnDash categories & tags are shown in blue.
TIP: All of these categories & tags, if enabled, can also be used as filters when using the Course Grid add-on. You can add a dropdown menu that will filter courses in the grid based on the chosen category or tag.
WordPress has a good article on the difference between categories & tags, and when & how to use each one.
Managing Categories & Tags #
You can manage (add, edit, or delete) the WordPress and LearnDash Categories & Tags via the Actions menu:
- Navigate to LEARNDASH LMS > COURSES
- Select the Actions dropdown menu
- Select your desired menu option

Course Custom Post Type Options #

These options will apply globally to all LearnDash courses on your site:
- Course Search: Enable this setting if you want courses to be included in search results when using the default WordPress search form on the front-end of your site.
NOTE
Course Search has nothing to do with Google search results. This setting only applies when using the built-in WordPress search form on your website.
- Archive Page: Enable this setting if you want visitors to be able to access the default course archive page. When enabled, a preview of the URL is displayed. Note: The design of this page is controlled by your theme, not by LearnDash.
- You need to re-save your permalinks after updating this setting. You can set the permalink URL for this page from your WordPress permalinks settings.
- RSS/Atom Feed: Enable this setting if you want to include LearnDash courses in the RSS feed of your site.
- Editor Supported Settings: You can choose which features of WordPress you’d like to enable for the Course post type.
- Featured Image
- Comments
- Custom Fields
- Revisions
NOTE: Be sure to enable “Featured Image” if you want to use images with the Course Grid add-on.
Global Course Management & Display Settings #

Course Builder #
The course builder is enabled by default. It simplifies course creation and, especially for larger courses, will save you a ton of time.
It can be disabled, but we recommend leaving it enabled.
Learn how to use the course builder
NOTE: If you want to reuse steps across multiple courses (aka: shared course steps), the course builder must be enabled.
When the course builder is enabled, you have a few additional options:
- Steps Displayed: This signifies the number of items that will appear in the course builder, before showing pagination at the bottom. For large courses, decreasing this number could make your courses easier to manage with the builder.
- Shared Course Steps: Read full documentation ┬╗
Course Table Pagination #
This setting allows you to customize the number of lessons & topics that are displayed for the:
- course content table
- course navigation widget
By default, if you keep this disabled, it will use your LearnDash general settings. But you can specify a number for lessons & topics here, and it will apply to all courses. But keep in mind, you can still adjust this on a course-by-course basis in your individual course display settings.
Mark Incomplete Enabled #
This setting allows users taking your course to mark a step in the course as incomplete in the event that they would like to go back and study the material further at a later point in time.
Here’s how to set this up: #
To enable the “Mark Incomplete” button in LearnDash, follow these steps:
In the WordPress admin area, navigate to LEARNDASH LMS > COURSES.
Click on the Settings tab.
Look for the Global Course Management & Display Settings section.
Enable the toggle for Mark Incomplete Enabled.
Save your changes.
TROUBLESHOOTING NOTE:
If you’ve already enabled this setting but still don’t see the “Mark Incomplete” button, try the following:
Clear your site’s cache.
Run a conflict test by disabling plugins and switching to a default theme to identify if there’s any interference.
Lesson and Topic Order #
NOTE
This setting is only enabled once you disable the “Course Builder” and refresh the page.
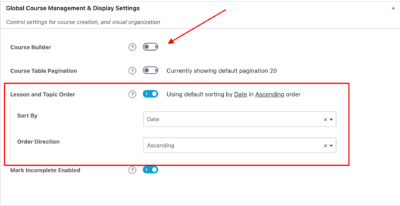
This setting allows you to customize how the lessons and topics are ordered and sorted.
- Sort By – you can select between “Date”, “Title”, and “Menu Order”.
- Order Direction– Select between “Ascending” and “Descending” for the order direction in which your topics and lessons are ordered.
By default, this setting is set to sort lessons and topics by Date in Ascending order.