One of the most common set of questions our support team gets asked is how LearnDash works with page builders.
- Which page builder plugins are compatible with LearnDash?
- What’s the best page builder to use?
- How do I customize the layout of my LearnDash courses, lessons and topics with a page builder?
- Can I use a free page builder or do I need the pro version?
In this comprehensive guide, we’ll answer all of those questions, as well as walk you through exactly how to use specific page builders to best design your LearnDash courses. We’ll focus on three of the most popular WordPress page builders:
NOTE: While we can work with the limited features of the free version of these page builders, especially Elementor, there will be certain limitations to the functionality. If you’re experiencing problems or are not seeing any functionality that you need from the below documentation, it’s likely that you need to upgrade to the Pro version. Elementor Pro is recommended if you plan to integrate fully with LearnDash, along with the other pro versions of the other page builders.
Before we dive into the specifics of each, it’s important to understand what a page builder can and cannot do. We’ll also cover some basics that apply to how all page builders interface with LearnDash, no matter which one you choose to use.
NOTE This guide assumes you are using the LearnDash 3.0 active template. With the exception of Elementor (which requires LearnDash 3.0), most of the concepts also apply to the Legacy template, but there could be some inconsistencies. We’ll also be using the new WordPress editor (aka: Gutenberg). Screenshots will look different if you’re using the Classic Editor plugin.
How Page Builders Work #
An entire book could be written on this topic, but that’s obviously not the focus of this article. However, there are a few basic things you should understand about how page builders work.
- Almost all page builders let you design the main content of a page, post, course, lesson or other custom post type. Essentially, the same content that you would add via the default WordPress editor.This does not include your site’s header, sidebars or footer.
- Most pro versions or premium page builders do let you design your site’s header, sidebars and footer. (Elementor Pro’s Theme Builder, Beaver Themer, etc.)
- All page builders come with their own set of elements that you can use to design and lay out your content (columns, headings, lists, tables, icons, photo galleries, etc.).
- These differ depending on the page builder you’re using, as well as the free vs pro version of that particular builder.
Keeping in mind the type of content a page builder has control over, let’s talk about how LearnDash content is added to your site’s pages.
How LearnDash Adds Content to the Page #
There are several ways LearnDash content gets added to a page. The differences are important to understand, as they directly apply to whether or not they can be controlled or modified via a page builder.
Dynamic Content #
Dynamic content refers to content that you, the site owner, does not directly add in the WordPress editor. Based on the type of page that a user is viewing (course vs. lesson vs. topic), as well as how that course is configured, LearnDash automatically adds content to the page.
Examples of dynamically added LearnDash content include, but are not limited to:
- On a course page: For non-enrolled users, the current status, price and get started sections at the top. For enrolled users, the date of last activity, progress bar and status indicator.
- On a course page: The course content list at the bottom, which contains all lessons, topics and quizzes assigned to that course
- On a lesson page: The list of topics assigned to that lesson
- On lesson/topic pages: The assignments area, which provides a way for the user to upload assignments, and lists all uploaded assignments
- In Focus Mode: The header, which includes a logo (optional), course progress, navigation buttons, and an avatar with dropdown menu
- In Focus Mode: The sidebar, which contains the course title and navigation links
DEVELOPERS If you’re comfortable with HTML and PHP, you can override LearnDash template files. This allows you to customize the dynamic content, as well as change where on the page it gets inserted. Technical experience required.
Your Own Course, Lesson, Topic & Quiz Content #
This refers to the content which you, the site owner, have direct control over. For all course, lesson, topic and quiz pages, you can freely add and edit whatever content you’d like.
If you’re using a page builder, you can design this content with your page builder of choice.
However, LearnDash determines where on the page it will go.

For example, on a lesson page (using Focus Mode), your own content will always be placed after the breadcrumbs and before the next and previous lesson buttons. If you’ve added materials to the lesson, two tabs will be inserted dynamically:
- Lesson
- Materials
Your own lesson content will be added directly below the “Lesson” tab.
Keep in mind, only your own content, added in this specific area, can be edited with a page builder. All other page elements in Focus Mode are controlled solely by LearnDash (or by using one of two popular third-party LearnDash design plugins, Design Upgrade Pro or Visual Customizer).
LearnDash Blocks #
LearnDash blocks provide a way for you to add specific LearnDash information to the main content area of a page, but only if you’re using the latest version of the WordPress editor (aka: Gutenberg). Blocks only work within Gutenberg.
A few examples of LearnDash blocks include:
- LearnDash Profile: displays a user’s profile and registered courses
- LearnDash Course List: displays a list of courses, or a grid if using the Course Grid add-on
- LearnDash Course Progress: displays a progress bar showing the user’s progress in that course

When using a page builder, there is no way to add a LearnDash block to your page.
LearnDash Shortcodes #
Every LearnDash block has an accompanying shortcode. A shortcode is a simple piece of text that outputs specific LearnDash information. Many shortcodes come with parameters (or options) that let you customize which information is displayed. See our complete guide on LearnDash shortcodes.
A shortcode looks like this:
[ld_profile]This example outputs a user profile, complete with their profile image, name, some basic stats, and a list of courses they’re enrolled in, along with their progress in each.
The big advantage of shortcodes over blocks is that they can be used with all page builders.
Exactly how to use LearnDash shortcodes depends on which page builder you are using, which we’ll go into more detail below.
LearnDash Widgets #
Widgets are a core part of WordPress. They are pieces of functionality that can easily be added to any WordPress sidebar area. LearnDash provides a handful of widgets as well. LearnDash widgets provide the ability to add course navigation, course lists, and other various course elements. We have a complete guide on widgets here.
The following page builders allow the use of LearnDash widgets:
Elementor: Free and Pro
Beaver Builder: Free and Pro
Divi: No (you can add entire sidebar areas but not individual widgets)
An Exception: Focus Mode #
Focus Mode works a bit differently than the rest of the pages on your site. The same ideas for how content is added still apply, but when Focus Mode is enabled, your site’s normal header, sidebar and footer are removed.
- The header is dynamic content, not editable with a page builder
- The sidebar course navigation is dynamic content, not editable with a page builder
- The page title, progress meter and breadcrumbs are dynamic content, not editable with a page builder
- The lesson, topic and quiz content (below the breadcrumbs) is your own content, and this is editable by a page builder
Summary #
- Dynamically added by LearnDash is only editable with Elementor (using our compatibility add-on)
- Focus Mode design elements cannot be edited with page builders
- All content added by you, via the WordPress editor, is editable with page builders
- When designing with a page builder, use LearnDash shortcodes and widgets (not blocks)
Choosing a Theme #
If you want to use a page builder with LearnDash, the theme you choose will have some impact on how you can design your content. Just about all WordPress themes work with page builders (and with LearnDash), but some work better.
In general, themes that explicitly provide page builder support will give you more control over the design of your courses. A few popular themes that have been specifically designed for use with page builders are:
You don’t have to use one of these themes. All WordPress themes (built to the proper standards) work with LearnDash. We just wanted to highlight the ones that give you the most flexibility.
General Page Layout #
Using one of the aforementioned themes provides you with some advantages over other themes, particularly when it comes to using a page builder.
NOTE: These settings vary from theme to theme. Not all themes will have these options, but the themes mentioned above have some variation of them.
- Content width: Multiple options are typically available for narrow, wide, full-width and/or 100% stretched
- Sidebars: You can choose to enable/disable the sidebar on individual pages, or choose which side it should appear (right or left)
- Disable page title: This allows you to hide the default page title that is included at the top of the page, and add your own using a page builder
- Disable featured image: This allows you to hide the featured image that is usually displayed at the top of your course page
Here are a few examples:
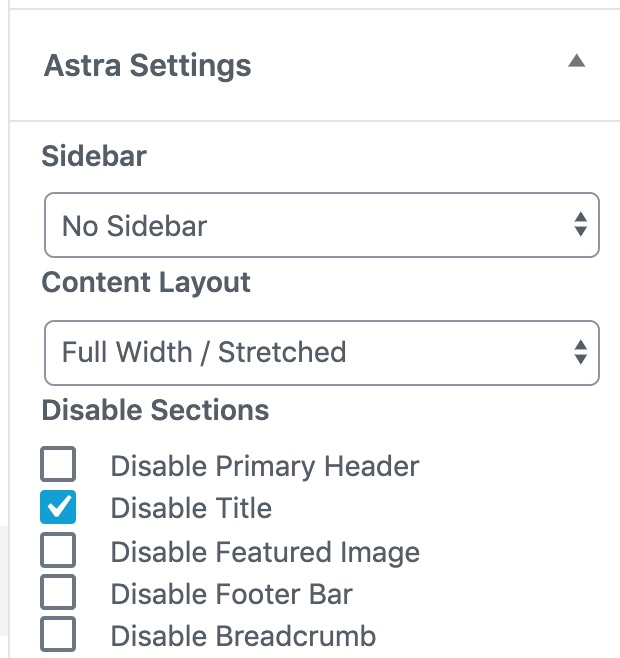


NOTE: If you want to control your layout & spacing completely with a page builder, you probably want to set your page settings to use no sidebar, and a content width of “full” or “stretched.”
Before we get into specific examples with each page builder, let’s make sure your builder is enabled for use with LearnDash.
Enable Page Builder for LearnDash Post Types #
Before you can use a page builder with LearnDash, you need to ensure that you’ve enabled the page builder to work with LearnDash custom post types. If you can’t find a way to edit a piece of LearnDash content using your page builder, try following these steps to enable it.
Elementor #
See https://learndash.com/support/docs/add-ons/learndash-elementor-addon/ for more information regarding our LearnDash Elementor integration.
Beaver Builder #
- Navigate to Settings > Beaver Builder
- Click on Post Types
- Check the boxes for Courses, Lesson, Topics and Quizzes (or just select the ones you need)
- Click Save Post Types

Divi #
By default, Divi should be enabled for courses & lessons, but if you want to use it with topics and/or quizzes, you’ll need to enable it.
- Navigate to DIVI > Plugin Options
- Click on the Post Types Integration tab
- Click the post types for Topics and Quizzes (or just select the ones you need)
- Click Save Settings

If using Divi as a theme, please follow the below steps:
- Navigate to Divi > Theme Options
- Click on the “Builder” Tab, then go to the “Post Types Integration” tab
- Click to enable the post types for Topics & Quizzes (or just select the ones you need)
- Click “Save Changes”

Using Shortcodes with Page Builders #
Shortcodes are one of two ways you can add LearnDash-specific content using a page builder. Let’s go through exactly how to add use shortcodes in each page builder.
Elementor #
See https://learndash.com/support/docs/add-ons/learndash-elementor-addon/ for more information regarding our LearnDash Elementor integration.
Beaver Builder #
When you go to edit a piece of LearnDash content, you’ll have a Launch Beaver Builder button where your content would normally appear. Click this button to open your content with Beaver Builder.

You won’t see any dynamically added LearnDash content in your preview until you publish the course. The content you add will be placed in-between LearnDash’s dynamic content.
To add a shortcode to your page with Beaver Builder:
- Locate the HTML module in the left panel
- Click, hold and drag the module somewhere on the page
- In the left panel, type any LearnDash shortcode
- Click the Save button at the bottom to preview it
- When you’re finished editing, be sure to click the Done button in the top-right corner, and then either Publish or Update to save your changes

Divi #
When you go to edit a piece of LearnDash content (course, lesson, topic or quiz), you’ll see a Use The Divi Builder button at the top. Click this button to open your content with Divi.

When you first launch Divi, you might be prompted with a few options:
- Build from Scratch
- Choose a Premade Layout
- Clone Existing Page
Choose the option that best meets your needs. You will then be sent to Divi’s visual builder screen.
To add a shortcode to your page with Divi:
- Click the green + icon to add a new row
- Choose the the layout of your row
- Then choose the Code module (the Text module will also work)
- Type in any LearnDash shortcode
- Click the green checkmark icon
- When you’re finished editing, be sure to click the three dots at the bottom of the screen, and then the Save button

Using Widgets with Page Builders #
In addition to shortcodes, widgets are another method of adding LearnDash content via a page builder. Let’s cover the specifics of each page builder that allows for the use of LearnDash widgets.
Elementor #
See https://learndash.com/support/docs/add-ons/learndash-elementor-addon/ for more information regarding our LearnDash Elementor integration.
Beaver Builder #
The same widgets mentioned above (for Elementor) are also available for Beaver Builder.
To add a LearnDash widget to your page with Beaver Builder:
- Click, hold and drag the widget somewhere on the page
- In the left panel, either switch your module group to “WordPress Widgets” or use the search feature

- (optional) In the left panel, give your widget a title and adjust the available settings
- When you’re finished editing, be sure to click the Done button in the top-right corner, and then either Publish or Update” to save your changes.
- Locate the widget you want to add

Basic Content Editing with Page Builders #
Now that you know how to add LearnDash shortcodes and widgets to your favorite page builder, let’s talk about a few basic editing rules that apply to all page builders when you’re working with LearnDash.
Conditionally Show/Hide Content #
LearnDash provides a few shortcodes you can use to show content to a specific type of user:
[student] and [/student]– Only visible to someone who is registered for the course
[visitor] and [/visitor]– Only visible to someone who is not registered for the course
These can be especially useful for:
- providing registered students with student-only content on the course page
- displaying a sign-up/purchase message to non-registered users when they’re viewing sample lessons
- …or any number of other creative applications
Unlike other LearnDash shortcodes, these cannot be used within a shortcode widget. They must be used within a text editor or HTML widget.
- Elementor: Use the Text Editor or HTML widget
- Beaver Builder: Use the Text Editor or HTML widget
- Divi: Use the Text or Code widget
You can place any content you’d like between the shortcodes, just make sure it is all contained within the same element. You cannot have an opening [student] shortcode in one element, add some content in subsequent elements, and then place your closing [/student] shortcode in another element.
NOTE: If you’re using the free Uncanny LearnDash Toolkit, you can also use the [uo_show] shortcode to show content to logged in vs. logged out users (regardless of course enrollment status).
Elementor Example #

Beaver Builder Example #

Divi Example #

FAQ #
I’m using a page builder not mentioned in this article. Can I still use it with my LearnDash-powered site?
Yes. The same principles mentioned in this article apply to all WordPress page builders. The widgets and modules you use might be named differently, but the concepts are the same.